Quantcast
Channel: How to – TransTech Systems, Inc
Viewing all 92 articles
Browse latest View live

Clean Printer – Fargo DTC4500e

$
0
0

Take the following steps to run a cleaning cycle on your DTC4500e:

Go to your printers and faxes folder. Right click on the Fargo DTC4500e and click printing preferences.

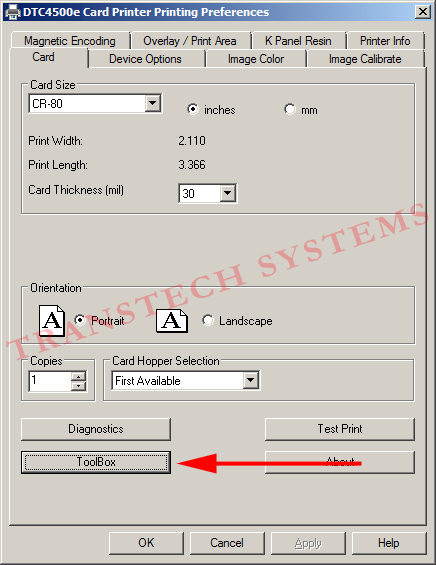
Click on the tool box tab

4500E_1

Click on the clean printer tab and follow the instructions

4500E_2


Wi-Fi Evolis Primacy Set Up

$
0
0

Please “Note” that only one PC can be connected to the printer at one time.

Open the Evolis Print Center and click on Tools Wi_Fi_Primacy Click on the Network and/or Wi-Fi printer installation wizard Wi_Fi_Primacy_2Ensure that you have the Wi-Fi printer set configuration selected Wi_Fi_Primacy_3 Click “Next” Wi_Fi_Primacy_4 Ensure that the Printer is connected via USB Wi_Fi_Primacy_5 Click Ok

Wi_Fi_Primacy_6Choose your printer from the drop down list box

Wi_Fi_Primacy_7Continue to follow the detailed instructions

Wi_Fi_Primacy_8

The full network administrator guide can be found here

Disable Cleaning Notification – Fargo C50

$
0
0

Take the following steps to disable the cleaning notification on your Fargo C50:

Go to your printers and faxes folder. Right click on the Fargo C50 and click printing preferences.

Click on the tool box tab

c50-1

Uncheck the Clean Printer box

C50_2

Update Evolis Primacy Firmware on a Mac

$
0
0

Click on the system preferences

Open Print & Fax

Select your Evolis Printer

Choose Options and Supplies

Click on Utility

Click on Open Printer Utility

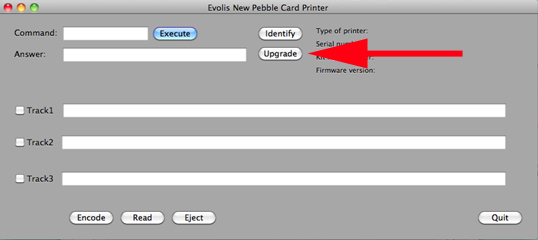
Click on the upgrade tab, browse for the firmware file. Firmware upgrade will proceed.

Primacy_Mac


Clean Printer – Fargo DTC1250e

$
0
0

Take the following steps to run a cleaning cycle on your DTC1250e:

Go to your printers and faxes folder. Right click on the Fargo DTC1250e and click printing preferences.

Click on the tool box tab

DTC1250e

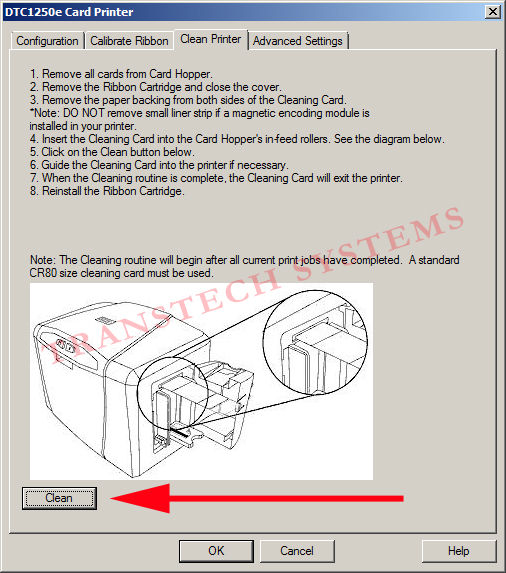
Click on the clean printer tab and follow the instructions

DTC1250e_1

Dual Side Print Setting – Magicard Enduro Duo

$
0
0

To enable dual sided printing for your Magicard Enduro printer, take the following steps:

Open Devices and Printers

Right click on the Enduro and click Printing Preferences

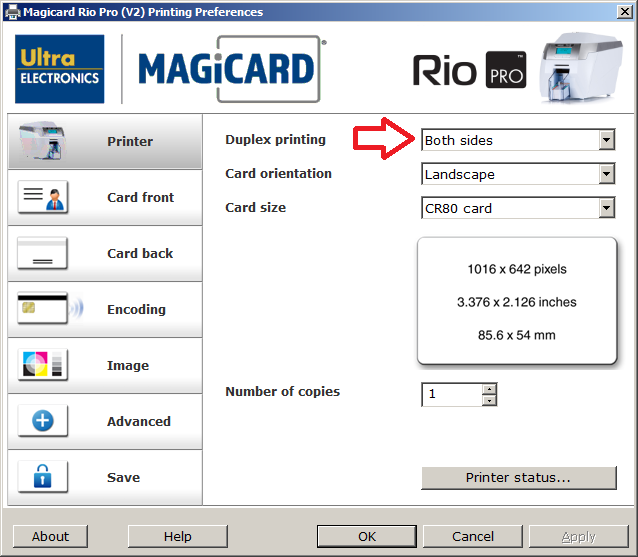
Change the Duplex Printing setting from “Front only” to “Both sides”

Enduro dual

Ribbon Sensor Calibration – Fargo DTC1250e

$
0
0


Take the following steps to calibrate the Fargo DTC1250e ribbon sensor:

Go to your printers and faxes folder, right click on theDTC1250e and choose Printing Preferences.

Click on the Tool box tab


DTC1250e


Once the Tool Box opens, click on the Calibrate Ribbon tab, read the instructions, and then click the Calibrate tab


DTC1250e_calibration


Clean Printer – Fargo C50

$
0
0

Take the following steps to run a cleaning cycle on your Fargo C50:

Go to your printers and faxes folder. Right click on the Fargo C50 and click printing preferences.

Click on the tool box tab

FargoC50_cleaning

Click on the clean printer tab and follow the instructions

FargoC50_cleaning2

DTC Cleaning Kit Part # 86177


Update Evolis Zenius Firmware on a Mac

$
0
0

Download the latest firmware from Evolis’ website

Click on the system preferences

Open Print & Fax

Select your Evolis Printer

Choose Options and Supplies

Click on Utility

Click on Open Printer Utility

Click on the upgrade tab, browse for the firmware file. Firmware upgrade will proceed.

Primacy_Mac


Dual side printing with a Macintosh Driver – Evolis Primacy

$
0
0

Please go to menu Print -> Advanced Options -> Layout to modify the Two-Sided options. They should be modified both in the first driver options window and also on the presets window (shown on the second print screen).

Also, you can confirm under Systems Preferences -> Print & Scan -> Options & Supplies -> Utility if you are able to change these settings directly in the printer driver.

Update Firmware – Magicard Tempo

$
0
0

Take the following steps to update your Magicard Tempo printer firmware:

Download the latest firmware version from Magicard’s website

Double click on the executable file and follow the instructions

Ribbon Sensor Calibration – Fargo DTC4500e

$
0
0

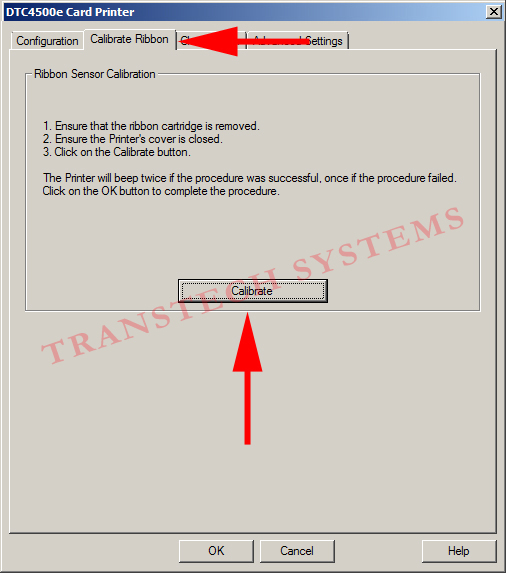
Take the following steps to calibrate the Fargo DTC4500e ribbon sensor:

Go to your printers and faxes folder, right click on the DTC4500e and choose Printing Preferences.

Click on the Tool box tab

4500E_11

Once the Tool Box opens, click on the Calibrate Ribbon tab, read the instructions, and then click the Calibrate tab

4500E_sensor

Self Test – Fargo DTC4500e

$
0
0

Take the following steps to print a self test- Fargo DTC4500e

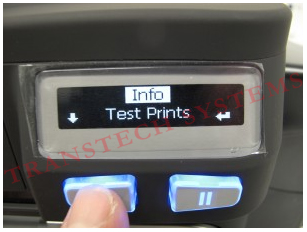
Press the right menu button

DTC4500e_self test

Use the left button to scroll down to Test Prints

DTC4500e_self test1

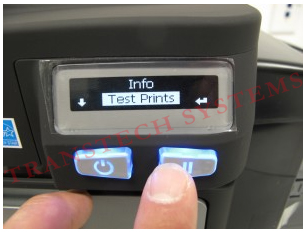
Press the right button to select Test Prints

DTC4500e_self test2

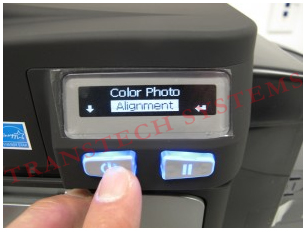
Scroll Down to Alignment and then press the right button

DTC4500e_self test3

Clean Printer – Fargo DTC1000ME

$
0
0

Take the following steps to run a cleaning cycle on your DTC1000ME:

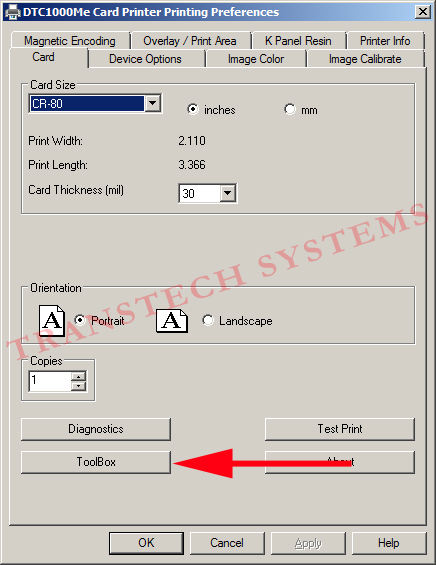
Go to your printers and faxes folder. Right click on the Fargo DTC1000ME and click printing preferences.

Click on the tool box tab

DTC1000ME

Click on the clean printer tab and follow the instructions

DTC1000ME_cleaning

Direct Ribbon Calibration – Fargo DTC4500e

$
0
0

Take the following steps to calibrate the ribbon sensor from the printer

Remove the ribbon and close the door

Press the right button


Use the left button to scroll down to Toolbox and then press the right button

Use the left arrow to scroll down to Calibrate Ribbon Sensor and the press the right button


Clean Printer – Fargo DTC300

$
0
0

Take the following steps to run a cleaning cycle on your Fargo DTC300:

Go to your printers and faxes folder. Right click on the Fargo DTC300 and click printing preferences.

Click on the Clean Printer tab

DTC300_cleanprinter

Read the instructions and then click on the clean tab

DTC300_cleanprinter2


Ribbon Sensor Calibration – Fargo DTC1000Me

$
0
0


Take the following steps to calibrate the Fargo DTC1000Me ribbon sensor:

Go to your printers and faxes folder, right click on theDTC1000Me and choose Printing Preferences.

Click on the Tool box tab

DTC1000ME

Once the Tool Box opens, click on the Calibrate Ribbon tab, read the instructions, and then click the Calibrate tab

DTC1000ME_calibrate

Direct Ribbon Calibration – Fargo DTC4000e

$
0
0

Take the following steps to calibrate the ribbon sensor from the printer

Remove the ribbon and close the door

Press the right button


Use the left button to scroll down to Toolbox and then press the right button

Use the left arrow to scroll down to Calibrate Ribbon Sensor and the press the right button


Dual Side Print Setting – Magicard Rio Pro Duo

$
0
0

To enable dual sided printing for your Magicard Rio Pro printer, take the following steps:

Open Devices and Printers

Right click on the Rio Pro and click Printing Preferences

Change the Duplex Printing setting from “Front only” to “Both sides”

Enduro dual

Setting Up the AssureTech ID-150 In Easy Lobby

$
0
0

To configure/install the Assure Tech id-150 successfully please do the following:

LOG IN AS THE LOCAL ADMINISTRATOR and disable the UAC (User Access Control) To do this just click on START, Type in UAC and select “Change User Account Control Settings”. Move the bar to never notify. You might need to restart the PC for this change to take effect.

1. Uninstall the old AssureTech ID-150 driver from add/remove programs

2. Unplug the device from the USB port.

3. Download and run the following driver:

Make sure you have the AssureID license Key (26 character alphanumeric license key). You need to install both the driver and the AssureID software. They are separate installers, so keep that in mind. There’s a video here if you need it:

4. After you have finished the driver installation, make sure to that the AssureID license has been activated via the system tray app icon. You do this by right clicking on the AssureID icon in the system tray and choosing Activate. I know you typed in the license when you installed the AssureID software, but you still have to activate the license after installation.

5. Make sure to run the SVM 10.0 update using the following link:

Viewing all 92 articles
Browse latest View live